
Celebrate your favorite American holiday with a custom made Stars & Stripes T-shirt!
Several years ago it was the beginning of July and we were making holiday plans for a parade and dinner with the extended family. My oldest sister-in-law is so good at dressing her kids in festive garb with big ribbon hair bows and the whole family arrives colorful and adorable. I , however, was in a small panic because my two kids had practically nothing red or blue in their closets and it was only hours before we were about to leave.
I quickly ran over to my sons closet and pulled out a plain white T that was big enough to fit his sister. Then I ran up to the craft room to find some blue or red fabric. A short while later our holiday was saved and my creation was done.
Ok, that retelling may be a bit dramatic, but I was happy my daughter had something 4th of July-ish to wear and I found an Old Navy flag shirt for my son in his play clothes.
Here’s what you need to know to create your own red, white, and blue patriotic shirt.
Let’s Get Started!
Stars & Stripes T-shirt Tutorial
Supplies:
T-Shirt (or tank top)
Red fabric
Blue Fabric
Thread
Wonder Under (find it HERE)
Star Stencil (use a cookie cutter or find a star online to print as a template)
Let’s Begin
Make sure to prewash and shrink any fabrics, and ideally the shirt itself. If you don’t prewash and fabrics you run the risk of one shrinking more than another in the wash, and pulling seams apart, or causing wrinkles.
Prepare the Stripes
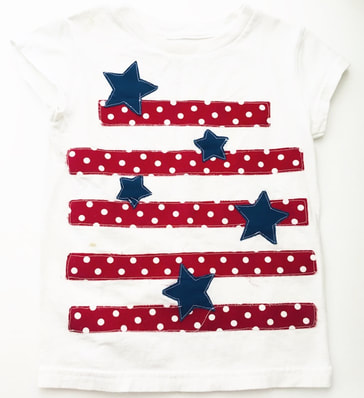
Select the red fabric for your stripes. Determine how many stripes you want. On my shirt there were 5. Cut a rectangle from the red fabric using the guide below.
Youth Shirt
Standard Size
Cut a 5 x 10 inch rectangle
Custom Size Suggestion
1 inch x # of desired stripes
Width of shirt minus 2 inches
Adult Shirt
Standard Size
Cut a 7 1/2 x 14 inch rectangle
Custom Size Suggestion
1 1/2 inches x # of desired stripes
Width of shirt minus 6 inches
Cut a piece of Wonder Under the same size as your red fabric rectangle and fuse together using an iron. Instructions for doing this will be included on your Wonder Under package.
Allow fused fabric to cool. Cut into strips based on the chart above. (1 inch strips for a youth shirt, 1 1/2 inch strips for an adult shirt). You can use a ruler and pencil to draw on the paper backing of the Wonder Under to make your stripes straight and even.
Prepare the Stars
Select a fabric for your stars. Cut a rectangle large enough for the size and number of stars you hope to add to your shirt. A 6×12 rectangle is a good start.
Cut a piece of Wonder Under the same size as your fabric and fuse together using an iron according to package instructions. Allow fused fabric to cool.
Using a stencil or cookie cutter, trace stars onto the paper backing of the Wonder Under. Cut out the fabric stars.
Adding the Stars & Stripes
Remove the paper backing from your pre-made stripes. Lay them out on your t-shirt in a way that is pleasing to you. This is where you can let your creative juices flow a little bit. Feel free to trim the stripes as needed to best fit your shirt.
Iron the stripes into place according to Wonder Under package directions.
Then, remove the backing from your stars and place them on the shirt in desired locations. Use your iron to attach the stars according to Wonder Under package directions.
Finally, allow the fabrics to cool.
TOP STITCH (optional)
For those who don’t sew, you can stop right here. The fused fabric will stay on through the wash. Enjoy your shirt and wear it proudly.
However, for added durability and a more finished look, I like to top stitch my designs. Top stitching, just means to sew closely along the edge of every piece. You can do this by hand or using a machine.

Choose a thread color. It could be coordinating or contrasting. Doesn’t matter.
Thread your machine (or needle) and sew along the edge of every stripe and star.
Tie off and trim any threads.
Hi I was wondering do you know if these fabric pieces can be cut on the cricket maker?
Thank you!
I have not tired to cut them on my Cricut. I just recently purchased a newer model that would allow me to cut fabric in that way. I would assume you could though!