
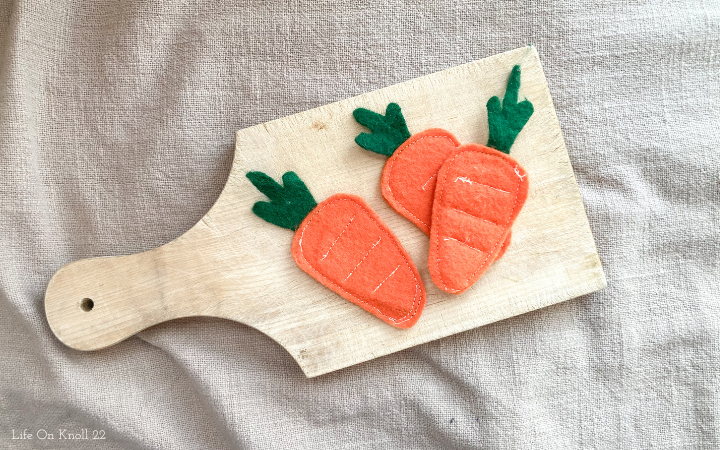
Make your own felt play carrots to use with a play kitchen. Part of my collection of felt play food that is easy to make by machine or by hand.

How I Created Felt Play Carrots
Shortly after the birth of our first child, I found my creative outlet in creating felt quiet books for our soon to be toddler to play with at home or during church. The first book I created was a farm theme, and I loved how it turned out. One of the pages was an activity where the child could “plant” and “harvest” carrots. I originally designed these felt carrots for that page but over the years may pieces in the book were lost and some things began to break. The carrots then moved from quite book to play kitchen.
Designing for Durability
One downfall of felt food is that is can get streatched out, pilly, and stained over time. While this obviously happens to anything that gets used by children, I do my best to make little upgrades that increase the durability of what I’m making.
For many of my felt patterns, I choose to reinforce the felt with fusing web (Wonder Under or Heat N Bond). This material helps give the patterns some rigidity (so they don’t get floppy) and helps adhere the pieces together in addition to any stitching. It also can keep felt from stretching and losing it’s shape. However, it won’t help prevent pilling or stains.
The carrots shown in this tutorial are the original ones I made over 12 years ago, and have been played with by 4 kids in some capacity or another. Are they perfect? No. Do they still look pretty good? I’d say they do.
Felt Play Carrots Pattern & Tutorial
Supplies:
- orange and green felt
- white or orange thread or embroidery floss
- fuzing web (Wonder Under or Heat N Bond) *
- felt play carrot PDF pattern download
- sharp scissors
- needle or sewing machine
*I recommend Ultra Hold Heat N Bond which is available at Walmart or Amazon.
Directions:
Cut Out Pattern Pieces
Begin by cutting out the paper pattern pieces from the felt play carrot PDF pattern.
Add Fusing Web
Follow the instructions on the fusing web package to cover the back of your orange felt with web . Use an iron or heat press to attach the webbing to the back of the orange felt and allow it to cool.
Cut out Felt Pieces
Now it’s time to cut the felt play carrot pieces. You will need two orange carrot roots and one green carrot top per carrot. Choose which carrot top pattern you prefer or mix ‘n match for a variety.
Use a pencil or pen to trace the paper carrot pattern pieces onto the paper backing of your fusing web.
Cut out the coordinating felt pieces for the carrots you would like to create.
Remove the paper backing.
Trace the pattern for the top directly onto your green felt or pin the paper pattern to the fabric before cutting.
Fuse the Carrots
Place two carrot roots fusing side together. Slide the base of the carrot top between the two layers and position to your liking.
Iron the carrot together, securing all the pieces.
Sew the Carrots
Using your sewing machine, or by hand, sew around the entire perimeter of the carrot root. Add the root texture as indicated by the dashed line of the pattern.
That’s It! Now it’s time to play!
Download the Felt Play Carrot PDF Pattern
Try Another Life on Knoll 22 Felt Pattern

Magnetic Felt Produce

Felt Pocket Pall
Felt Doll Pattern
Leave a Reply