
Spring felt finger puppets pattern & tutorial inspired by our favorite Easter time animals: bunny, chick, and lamb.

I designed this pattern for a HomeKeeper Workshop that I hosted at my home this spring. Finger puppets are such a great project for sew-ers of all ages and abilities. How adorable are these little animals? Too cute! I just couldn’t wait to share them all with you.
You don’t have to participate in one of my HomeKeeper Workshops to enjoy this free pattern for yourself. I’ve included everything you need right here.
Supplies & Cost
Felt is such an easy material to work with, and along with all the other supplies needed for these spring felt finger puppets, is very affordable. I also love that everything you need can be easily kept in a quart size zipper lock bag, making it easy to bring along on the go in a purse or backpack, and simple to stow away at home.
Skill Level
These patterns only require simple stitches, like a running stitch or whip stitch, and basic knot skills, along with the ability to thread a needle.
In my opinion the chick is the most simple to construct, so if you’re new to sewing or crafting, perhaps you should start there.
Time
At my workshop we actually were only able to get to ONE of the animal designs in the designated time. I would plan about 45 minutes to an hour for your first time through the whole process, which includes cutting out the pattern, cutting felt pieces, separating floss strands, sewing, and attaching the eyes on one design. Obviously each person has their own skills, speed, techniques, and standards so construction time will vary.
Spring Felt Finger Puppets
Supply List
Felt
- light pink
- white
- ivory
- carmel (cashmere tan)
- gold (yellow)
- orange
Embroidery Floss
- white
- tan
- black
- pink
Other
- Needle
- Sharp Scissors
- Black 6/0 (4 mm) glass beads
- pen
- sewing pins (optional)
Shop the Supply List!
*as an Amazon associate I earn from qualifying purchases. See my full disclosure HERE
All Patterns
Unless noted, for sewing in this project I used a single strand of floss, threaded through the needle, and then tied the ends together, making it a double stranded stitch.
The exception is when using black thread for the eyes and details. I used a double strand of floss, through the needle and tied off at the ends, for a 4 strand stitch.
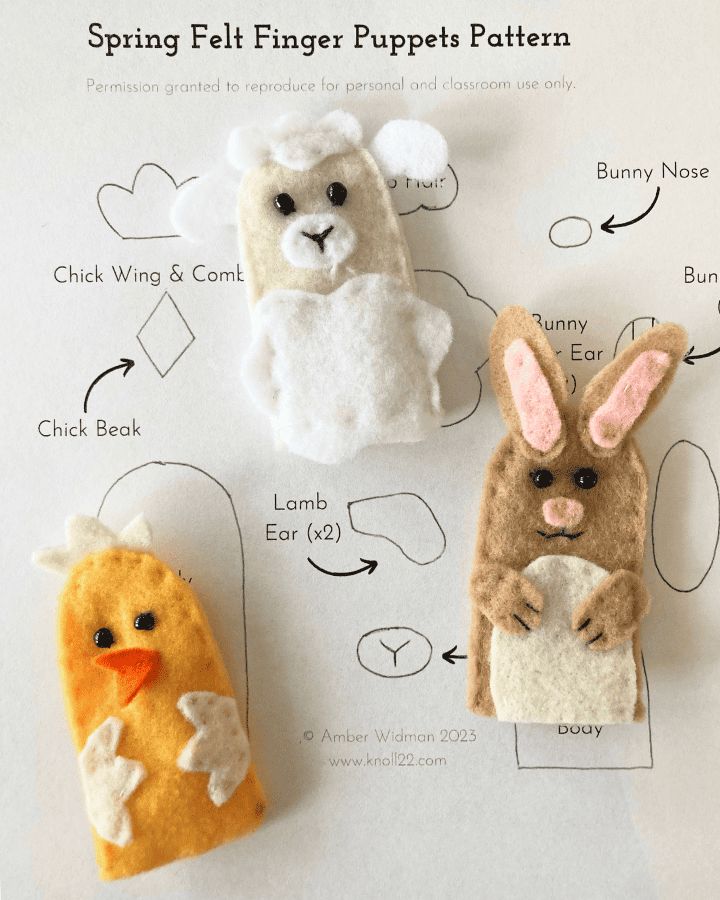
Lamb Pattern

Cut Out the Pattern & Felt Pieces
Begin by gathering all necessary supplies, and cutting out the paper pattern pieces labeled “lamb” on the downloadable PDF Spring Finger Puppet pattern sheet.
Next, cut out two puppet body pieces in ivory, and all of the lamb pieces in white (body, hair, nose and ears).
Create the Lamb
Start sewing by using white floss to attach the lamb body, lamb hair, and nose to the front of one puppet body piece
Add the Eyes
Then, use black floss to sew the nose detail and attach the eyes. To ensure that my eyes don’t get loose or fall off, I stitch through the eye multiple times, and knot from the backside after each stitch to keep everything tight.
Finish the Puppet
Lastly, stack the two puppet body pieces, and place the ears between the layers on each side of the puppet head. Make sure the ends of the ear are far enough into the puppet that they will be caught with the stitches as you sew the puppet together.
Finally, using white floss, begin sewing at the bottom corner of the puppet and continue up the arch, attaching the ears when you reach the head. Leave the bottom open for inserting your finger.
Tie off and you’re done!
Chick Pattern
Pattern & Pieces
Begin by gathering all necessary supplies, and cutting out the paper pattern pieces labeled ‘chick” on the downloadable PDF Spring Finger Puppet pattern sheet.
Using your pattern pieces, cut out two puppet body pieces in yellow felt, the beak in orange, and three wing/comb pieces in ivory. You can do this by tracing the pattern onto the felt, or by pinning the papers to fabric. For some small pieces (like the beak) is may be easiest to just cut free hand.
The Wings
Using a single strand of white embroidery floss, attach the wings to the front of one body panel. I prefer sewing around the entire wing, but you could sew just along the outer edge of the body panel to create a wing that can “flap” open and shut.
Attach the Eyes
Next, use a double strand of black floss to attach the eyes. To ensure that my eyes don’t get loose or fall off, I stitch through the eye multiple times, and knot from the backside after each stitch to keep everything tight.
Form the Beak
Use tan floss to attach the beak by sewing a straight stitch across the middle of the diamond. This will form two 3D triangular beaks.
Finish the Body
Stack the two body pieces together, and place the comb between the two layers of yellow felt, at the top of the finger puppet. Make sure the three bumps are sticking out, but enough felt still inside to be caught by the stitches as you sew the puppet together.
Using tan floss, begin sewing at a bottom corner and stitch around the entire arch of the puppet, catching the comb in the stitches at the top. Be sure to leave the bottom open for your finger.
Tie off and you’re done!
Bunny Pattern

Prepare the Pattern and Felt Pieces
Begin by gathering all necessary supplies, and cutting out the paper pattern pieces labeled “bunny” on the downloadable PDF Spring Finger Puppet pattern sheet.
Cut out two puppet body pieces, the ears, and the paws in caramel felt. Cut out the bunny body panel in ivory, and two ears and the nose in pink.
Add the Bunny Belly
Begin by using white floss to attach the ivory colored bunny body panel to the front of one finger puppet body piece.
The Nose and Ears
Next, use pink floss to attach the nose, and connect the pink inner ear to the outer ears.
Note: if you don’t want the pink stitching to show in the back of your ears, make sure you use shallow stitches that don’t penetrate completely through the fabric, but only go about half way through the depth of the felt fibers. This will keep the stitches hidden “inside” the fabric.
Paws & Ears
Then, use tan floss to attach the bunny paws to the front of the puppet body overlaying the belly. Position the ears to your liking, on the front body piece, and attach them.
Add the Details
Use black floss to add mouth and paw details and attach the eyes. To ensure that my eyes don’t get loose or fall off, I stitch through the eye multiple times, and knot from the backside after each stitch. This helps to keep everything tight.
Finish the Body
Finally, stack both puppet body pieces and use tan floss to sew around the entire arch of the puppet. Start at one bottom corner and finish at the other, leaving the flat bottom open for your finger to insert.
Tie off and you’re done.
Download the Felt Finger Puppet PDF Pattern
*permission granted to reproduce for personal and classroom use only.
Leave a Reply