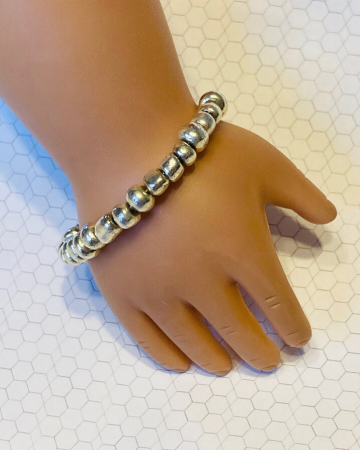
These tiny doll bracelets are so darling. My daughter and I designed them for our Etsy shop which we named Elsie Rose Doll Boutique. They are inexpensive and easily put together. Perfect for gifts or expanding your dolly’s wardrobe.

This doll bracelet tutorial is designed to fit an 18 inch doll.
Materials
Begin by gathering a few simple supplies. These doll bracelets only require a small upfront investment and lend themselves to endless combinations and possibilities. In this tutorial I’m using 40 gauge glass beads, but glass seed beads and small wooden beads are also great options.
- Round Nose Pliers
- 20 gauge wire
- 40 gauge (size 6) glass beads
Making the Doll Bracelets
Prepare the Wire
Begin by using the wire cutters on your pliers to cut a 4 inch section of wire.
Use the rounded nose of your pliers to bend a small eyelet on one end of the wire. To do this, clamp the tip of the wire between the two barrels of the pliers, and twist to wrap the wire around. The closer your wire is to the end of the pliers, the smaller your eyelet loop will be since most pliers have a conic shape that widens closer to the handles. In my opinion the smaller the loop the better to provide a nice finished look. The function of this eyelet is to hold the beads onto the wire, so make it bigger than the hole of your beads and it will keep them from sliding off the end as you construct the bracelet.
Add the Beads
Next, string the beads onto the wire. Due to variations in materials, it’s possible not every bead in a package will have a hold large enough to allow the wire to push through. (I found this especially true with seed beads.) Fill the wire length with your desired beads leaving about 1/4 of and inch of wire unfilled.
Once again, using your round nose pliers, clamp the very end of the wire between the barrels of the plier and twist to make an eyelet loop. You want your beads to have a little bit of wiggle room to accommodate for the curve once you bend it into the bracelet shape, so don’t fill it too full or twist it too tight. Once you’ve made a few bracelets you can get a feel for how much wire and wiggle you will need. This can vary based on bead size.
Shape the Doll Bracelet
Finally, bend the entire wire and bead strand so that the eyelet ends are touching. Play around with the shape to make a nice even circle.
When you put the bracelet onto your doll, you can adjust the diameter of the doll bracelet for desired fit. Different brands of 18 inch dolls have varying wrist sizes. This design allows you to bend the wire accordingly.
Troubleshooting
If you’re beads are too tight because your wire is too full you can go back and untwist one of the ends and remove a bead to allow for more space. Similarly, you can also add beads if needed.

Leave a Reply