
These adorable miniature magnetic felt root vegetables use rare earth magnets to interact with both my felt dolls and pocket pals patterns.
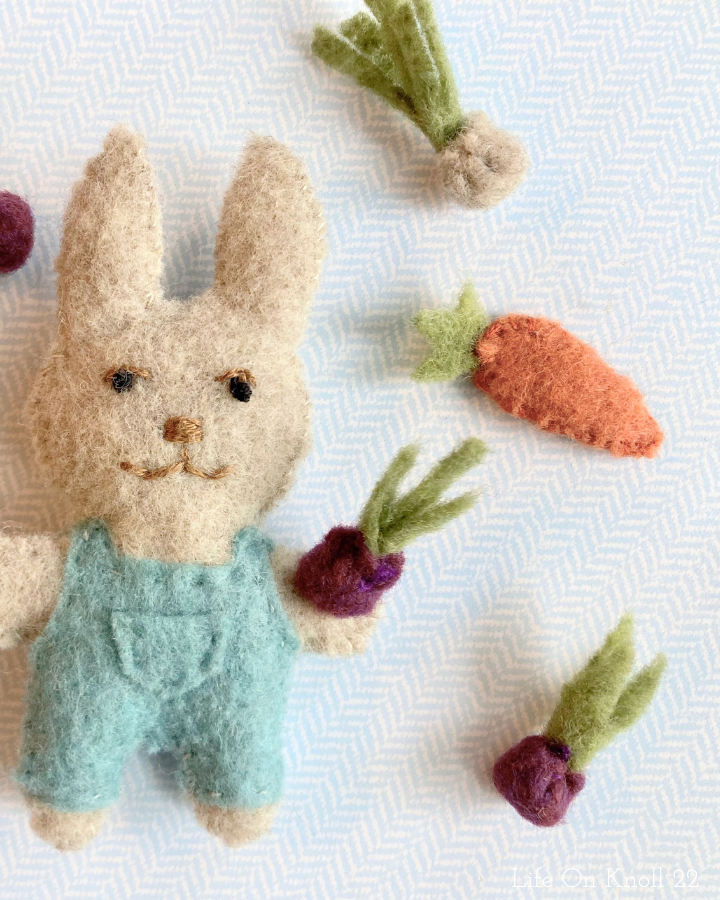
After creating my magnetic Farmer Rabbit I set about creating some adorable accessories to go with him. Since he loves to be in his garden, some fresh produce seemed to be just the right fit.
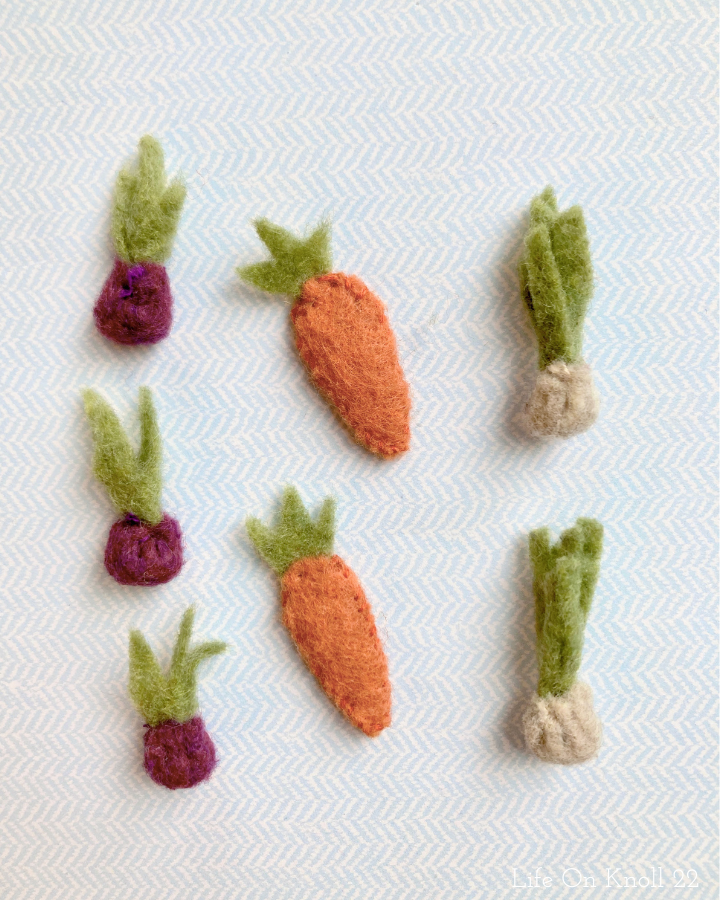
This pattern contains the parts for two different vegetables (shown below); a beet and an onion. Since the beet and onion are so similar they will have the same set of instructions, but the carrot will be separate and further down in the post. Don’t miss it!
You may choose to use other colors of felt to create your own variations such as a turnip or radish, but throughout the pattern they will referred to as beet and onion.
Magnetic Felt Root Vegetables : Beets & Onions
Supplies
- felt of various colors (white, green, burgundy)
- coordinating colors of thread or embroidery floss
- needle
- scissors (Large) (Small)
- 6×2 mm rare earth magnets
- magnetic felt produce PDF printable pattern
Find my complete Felt Supplies List HERE
Cut the pieces
Begin by cutting the paper pattern pieces that you wish to use. Many of the pieces in these patterns are quite small so you may find it easier to free hand the cuts rather than try to trace them exactly. Items of roughly the same size will work just fine.
Once you have cut the desired pieces, thread your needle with a color of thread that matches the root.
Gather the Roots
We are going to begin by inserting a gathering thread into the root piece. This does not sew anything together, but allows us to cinch the 2D circular felt pieces into a 3D ball shape for the root balls.
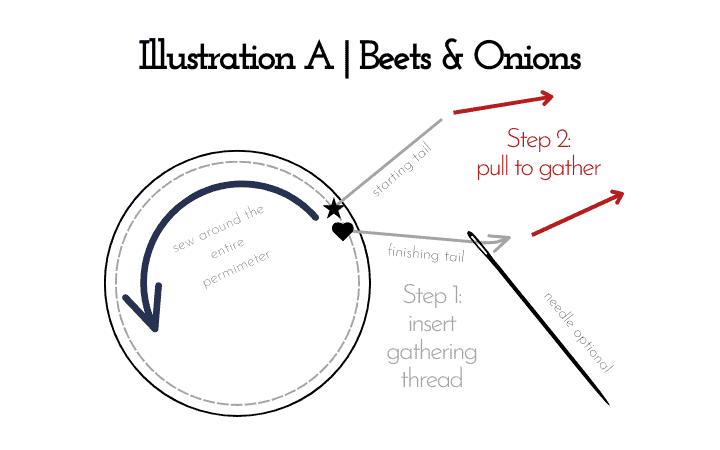
Step One: (In Gray) Gathering
Insert your needle into the root piece as shown by the star on the illustration (A) below. Be sure to leave a few inches of tail before beginning your first stitch.
Use a running stitch (up and down pattern) to sew all the way around the exterior perimeter of the root pieces. This is indicated by the grey dashed line in illustration A. Finish one stitch short of a complete circle, and leave a finishing tail (indicated by heart on illustration A).
Once you have placed gathering thread into the root piece, leaving a tail at the beginning and also leave a tail at the end, we can now create a 3D round shape.
I find it easiest to leave the needle on at this point, since we will still be using it later on to attach the green and secure the root ball, but you can also do this next step without a needle in place. Either way DO NOT TIE OFF! The thread needs to be able to move freely through the fabric.
Step Two: (In Red) Form a Root Ball
We can now begin to gather (cinch) the root ball as shown by the red arrows in illustration A. Do this by pulling on both strings at the same time.
Once your root ball as formed a bowl shape, insert your rare earth magnet into the bottom of the root. It doesn’t matter which side is facing up as there will be enough room for it to flip around within the root once the project is done.
Still don’t tie anything off. You should have a bowl shaped felt with a magnet in the bottom at this point. Before we pull it closed and tie it off we need to add the greens.
Step Three: Add Green Tops
Once your root ball is formed you can insert the green tops.
Select the greenery tops of you choice and lay it in front of you with the base side down (fringe edge up). Roll the piece into a tight roll from left to right. Think cinnamon roll or jelly roll, roll that baby up keeping the base edge together. Don’t worry too much about the fringes on top at this point.. Insert the bottom of the rolled greens into the center of your root ball bowl. Open the root ball slightly if you need to make room for the greens to fit. Make sure the bottom edge of the greens is as far down as it can go (sitting on top the magnet) for best results.
Gather/cinch the root ball tight around the greens. Once they are adjusted to your liking tie the strings on your root ball as tightly as possible with a couple small knots. DON’T TRIM ANYTHING YET.
If you didn’t removed your needle in step two, then don’t remove it now either. We still have a few more stitches to make.
If you did remove it in step two, then go ahead and rethread the longest tail of the two strands you just used to cinch and tie up.
Step Four: Secure the Greens
While we are currently holding the greens inside the root ball with our “hug” tie off, they are not secure and will pull out if any force is used on them. We need to sew them in places so the won’t fall out during play.
Begin by, inserting your needle and thread through the root ball felt (near the top is best), then through the rolled up base of the greens, and finally out the other side of your root ball to make a securing stitch. This will keep the greens from pulling out.
Repeat several times to secure the greens, by pushing your needle through all three layers from multiple directions around the top edges of the root ball. Basically, just put bunch of stitches in it to secure the root ball and the greens. Pull everything tight, tie off and cut any strings.
Repeat to make as many vegetables as you wish.
Magnetic Felt Root Vegetables: Carrot
Supplies
- felt of various colors (green, orange)
- coordinating colors of thread or embroidery floss
- needle
- scissors
- 6mm rare earth magnets
- magnetic felt produce PDF printable pattern
Step One: Cut your Pieces
Gather all necessary supplies and cut out the paper pattern pieces from your PDF pattern. For each carrot you would like to make, cut two orange carrot roots and one carrot top.
Step Two: Sew the Root
Thread your needle with orange thread (I use two strands of embroidery floss). Stack your two carrot root pieces, and begin sewing near the top (wide end) or your carrot root. Be sure to leave space at the top to insert the green when the time comes.
Sew all the way around the carrot root with a whip stitch leaving an opening at the top. DO NOT TIE OFF.
Step Three: Insert Magnet and Carrot Top
Insert a 6mm rare earth magnet (optional) into your carrot opening, and then tuck the base of the carrot top into the opening between the two layers of root. Using the orange thread, continue sewing across the remaining section of the carrot using a running stitch. Be sure to catch the green top to secure it tightly as you go across.
Once you have reach your starting point, tie off and cut any threads.
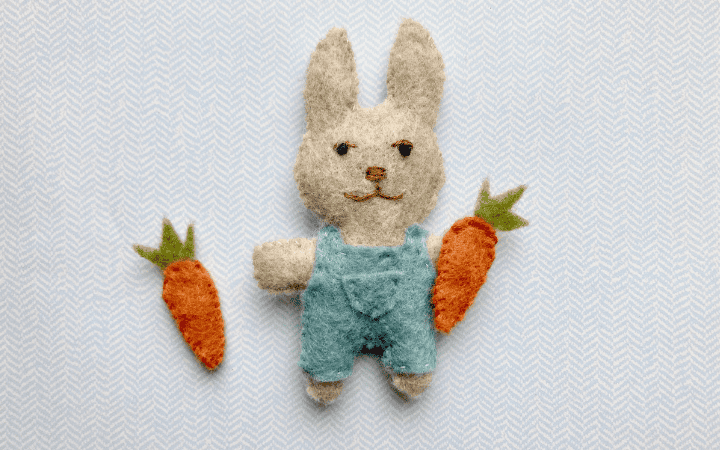
That’s it! You not have a magnetic felt carrot.
DOWNLOAD THE FREE PDF PATTERN HERE
Magnetic felt root vegetables are compatible with these other magnetic felt patterns….

Felt Pocket Pals (Farmer Rabbit)

Magnetic Felt Dolls
Leave a Reply