I first decided to make these sweet junior farmhouse aprons for my girls using a Christmas apron my grandma had given me as inspiration for this pattern.
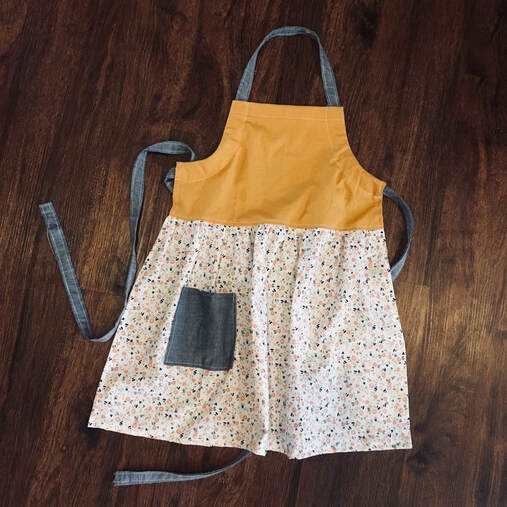
Materials:
- Bodice: 1/3 yard
- Skirt: 1/2 yard
- Straps: 1/4 yard
- Coordinating thread(s)
- Printed pattern (available at the end of this blog post)
- Sharp Scissors
- Sewing Machine
- Pins
Unless otherwise stated this pattern uses: 1/4 inch seam allowances and 1/2 inch double folded hems.
Junior Farmhouse Apron
Step One: Sew the Tie Strap
Cut two strips of fabric 3 inches wide and the length of your fabric (typically around 45 inches). Sew both strips together into a continuous length by aligning two of the 3 inch ends, right sides together, and sewing a 1/4 inch seam.
Open the seam and iron it flat.
Fold the fabric in half lengthwise (right side out) along the entire length of the strap, ironing as you go.
Then, open fabric to show center fold line, and place right side down on your work surface.
Fold each raw edge in to the center fold (wrong sides together), ironing as you go.
Hide raw edges by folding in both ends, then closing the strap along the center fold crease.
Top stitch along the open edges of the fabric to close the strap. (I did this at less than 1/4 inch seam allowance)
In the end you should have a strap 3/4 inch wide by approx. 80 inch long.
Step Two: Form the Bodice
Cut a 10 inch tall by 16 wide rectangle. Fold the bodice piece in half vertically (the fold will be in the front center of the bodice piece).
Then, place the arm pattern piece in the upper corner opposite the fold (along the raw edges of the outer corners of the bodice piece).
Pin to secure. Cut along pattern to create an ‘arm hole’.

Next, cut two ‘J’ shaped pattern pieces. These will be used to create a space for the tie to run through on the backside of the bodice. To do this, first stack two pieces of fabric (right sides together) and pin the J pattern piece on top. Use scissors to cut. You will end with two “J”s that turn in opposite directions.
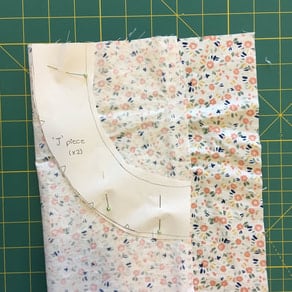
Working with right sides down on your work surface, fold and iron a 1/2 inch hem along the longest edge of the ‘J’ piece. (illustrated by a dashed line on the pattern). The 4 triangular notches will allow you to follow the curvature without bunching.
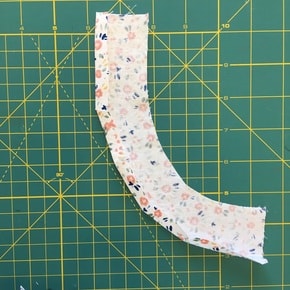
Along the ends of each ‘J’ piece, fold, iron, and sew a 1/2 inch hem. (Illustrated as a solid line on the pattern). This will create a finished edge where the strap will eventually enter the bodice. Set the J pieces aside.
Next, create a top hem on the bodice. Working right side down on your work surface, fold down the top edge of the bodice ½ inch and iron. Fold down again, this time 1 inch, and iron. Sew along the open edge to hem.
Finally, attach the ‘J’ pieces to bodice. First, line up the inside curved edge of each J piece with its respective ‘armhole’ on the bodice, right sides together, and sew. (The hemmed top of the J piece and the top of the bodice should line up.)
Repeat for both ‘armholes’. Turn the J pieces and bodice right side out and press seam. DO NOT sew inside edge of J pieces down. We will do this later.
Step Three: Apron Skirt
Cut a 15 inch by 27 inch wide rectangle. (You may add extra length to the first measurement for a longer skirt. Sew a gathering stitch along the top (longest) edge.
OPTIONAL POCKET: Cut a 6 inch wide by 7 inch tall rectangle. Hem top edge by placing pocket right side down on work surface, and folding over top edge ½ inch. Iron and sew. Still working right side down, iron ½ inch hems along all remaining sides. Place pocket in desired spot on apron skirt. Top stitch along the sides and bottom to secure pocket to apron skirt. Complete this step before gathering apron.
Gather Apron
Sew a loose stitch along the top longest edge of the skirt piece leaving plenty of extra thread on each end of the fabric when you remove it from the machine.
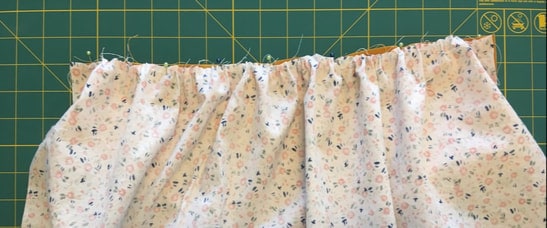
Gently pull on the string to bunch (gather) the fabric along the loose seam. Continue gathering the top edge of the skirt until the ruffled gather measures a 16 inch width.
Attach gathered end of skirt to base of bodice by laying both pieces right sides together and pinning in place before sewing. (The width of the skirt and the width of the bodice should line up. If they don’t, adjust gathering as needed)
Serge or zigzag along raw edges on the inside of the bodice/skirt seam.
Open seam and turn over apron.
Then top stitch along the bottom of the bodice, approx. 1/8th inch above the bodice/skirt seam, being sure to catch the raw edges of the skirt gathering on the backside.
Step Six: Hem the Apron
Starting at the top of the bodice we will hem down the sides first (bodice and skirt), and then across the bottom of the apron skirt.
Lay the apron right side down on your work surface. Be sure the J pieces are also laying flat and right side down.
Iron a hem by folding the fabric over ½ inch, starting at the ‘J’ piece (where the tie will exit the bodice) all the way to the base of the skirt on both sides.
Fold ironed hem over ½ an inch again, to hid raw edges, then iron. (This is what I mean by a double folded hem.) Do this for both edges of the apron.
Sew along open edge to hem. (Sewing from top to bottom you will hem the ‘J’ piece opening, then the bodice edge, then the skirt)
Once the sides have been sewn, it’s time to hem the bottom of the apron skirt.
Repeat the hemming process above along the bottom of the skirt. Fold 1/2 inch, iron, fold in 1/2 inch to hide raw edges, iron again, sew along open edge.
Step 7: Finishing Touches
Working on the back side of the apron, secure the J pieces to the bodice.
Begin by folding the J pieces into position, wrong sides together, on the back of the bodice.
Top stitch along the open side (ironed hem line) from one edge of the bodice to the other. (I did this at less than 1/4 inch seam allowance starting at the top of the bodice and working toward the bottom of the armhole cutout).
When complete you will have successfully created a tube-like space for the strap to run through.
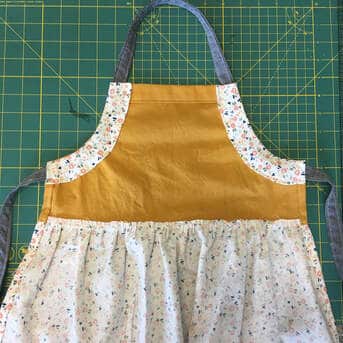
Finish off by threading strap through both arm ‘tubes’. (This can be easily done by attaching a large safety pin to one end of the strap and using it to guide the fabric through)
That’s it! Are you ready to try to make a Junior Farmhouse Apron on your own?
Be sure to post a picture on social media and tag #lifeonknoll22

Leave a Reply